Tuesday, July 19, 2011

Homemade Frugal Croutons or "Fancy Scmancy Yippie Lookin Salad Toppins"

            I like to make things out of stuff that no one else might want, I like to re-purpose things, including food.. hence my love of day old bread. I like to make crackers and croutons, the kids love to eat them and so does Brian.             Making croutons is so easy, I can not believe there is even a market for packaged ones! They look fancy, they are great on top of tomato soup, to snack on, to put on *gasp* a salad! I should give a definition of Yippie- since it is in the title- I made the little word up ( and yes I am taking credit for the word, so don't try it!) It is a mash of two words~ Yuppie and Hippie... you know those   people who love their earthy crunchiness, tyedye, gardening and dirt, BUT- also love their money- their fancy things.... I know not really a technical definition- but think hard- we all know a Yippie!!
            Anyway- on to the croutons- now that I have probably offended someone!

Here is the recipe:


One loaf of day old bread- usually italian works best.
Olive oil, amount depends on size of loaf usually I add about 2 tablespoons- or other oil- I used Smart Oil- since I had it in the house from coupons!
Your favorite seasonings to taste- I used Onion Salt and Italian seasonings.

Cut the bread into bite sizes that you prefer, place bread in a large bowl or stock pot.. add oil and seasonings mix by hand-- it is just easier. Bake at 250 for about an hour- or until bread is dry and crisp.. checking on it about every 15 min to make sure it isn't burning, you can turn it in the pan- I use a large cookie sheet.

Allow to cool and store in a ziplock bag. If you make more than you think you will use in a week - you can freeze them! Freeze them in a ziplock freezer bag, it works great.


The package of Italian Bread- DAY OLD:) Plus, the evidence of the 50% off tag on the day old bread!
Cutting away on the board!
I cut these ones a little bigger than I normally do- I wanted to give it a shot see how they turned out- plus I was tired.
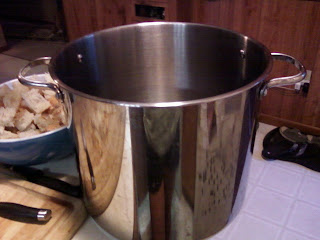
Large stockpot, I tried a large bowl, as I usually do, but they just didn't fit well this time.
The seasonings I used- Onion Salt and Italian
Oil
Mmmmm mixing by hand- clean hands mind you!
One the sheet ready to bake! and then enjoy!

Tuesday, July 5, 2011

The Master Gardner's Garden~ a month later

            So- I finally am getting around to posting the current pictures of Brian's Garden- aka- The Master Gardener's Garden-
           It really is coming along nicely here up north- I hear about other people already harvesting things and I get jealous- but then I just need to remember we are in Central Pa, where the garden doesn't go in until after Memorial Day.
           We - well Brian almost lost a tomato plant- it became a new nickname for him " the tomato whisper" when the plant actually came back to life.
And here is what it looks like now:
All the lovely tomato plants, to the left are the beefsteak big sandwich kind and the other 2 rows are the Italian canners and sauce/salsa ones

Next to the tomatoes, are all the peppers- we did lose 3 habanaro peppers - but we have so many other hot varieties I figured it was fine.

At the top of the picture are the cucumbers for pickles and then my zucchini plants.

Pretty Zucchini blossoms!

A different view from the top of the yard

A banana pepper hiding, but growing!

Brian's self proclaimed "Salad Bar" of lettuce, radishes, onions and some garlic.

So how is everyone else's gardens growing?!

Saturday, July 2, 2011

Jalapenos!!!! Not on a Steeeeick... Pickled!

            This week in my many travels to the local Weis Market, I noticed that Jalapenos were on sale for 99 cents a pound, to me this is a good deal. We have plenty of hotter varieties of peppers in the garden, but we would never produce enough to can actual numerous pints of pickled jalapenos... and the older boys and myself- are really beginning to love love love them - on everything! 
            At 2.99 to 3.49 a jar at the store, I knew I could make them cheaper. Brian was all for it- since he is a true man and canner- he actually woke up this morning and said " I can not wait to can those jalapenos, I actually dreamt about it".
            I purchased just over 12 lbs of jalapenos- you should have seen the look on the cashier's face....

We ended up using about 10 lbs of those and I am saving the other 2 lbs to make poppers for Brian's Aunt Mo's Fourth of July party Monday.

I am going to put the recipe first - incase someone doesn't to scroll thru all my pics- I was pic happy thru this procedure! 


Pickled Jalapenos:
Jalapeno Peppers (10 lbs)
Canning salt 7TBSPs
Vinegar (white) 14 cups- maybe a little more
Rubber Gloves- trust me - DO NOT DO THIS WITH OUT RUBBER GLOVES!!!
Wash and slice Jalapenos, pack into sterile jars, leaving 1/4 inch head space.
Bring vinegar and salt to a boil... Pour Hot liquid over jalapenos and leave the 1/4 head space there!
Process in a boiling water bath for 10 minutes.
most people say wait at least 5 weeks to eat them, I don't know if I can keep the boys away that long!

Now I can start the pic show! 

I have to disclose that Brian is a hard worker- he totally does half the work when we can together!


Here are the peppers - well some of the 10 lbs, after being washed!


Brian slicing and dicing the peppers! With rubber gloves mind you!


The little buggers could get slippery wearing the gloves and being freshly washed- this one ended up on the rug!
My handsome helpful hubby cuttin away!

Aren't they pretty all cut- I wanted so bad to eat one raw- but I bailed!
packed in the jars awaiting the vinegar and salt mix that is boiling... I used a funnel to fill the jars- tapping them as i added handfuls to fit more in the jars.
Vinegar is almost boiling!
A nice ring in the jar after filling with the vinegar mix
Yes I lifted the canner lid- just for the action shot of the jars in the boiling water bath
21 pints- Yehawwww- and one Quart! I love this picture!

The only thing better than this picture is the Ping noise I hear every few minutes of the jars sealing... Oh and the fact that Brian helped me make sure the kitchen was clean too when we finished.